Monday, May 10, 2010

PSA: Respect the Main Thread

I tweeted this earlier as a joke, but it's actually a very serious thing. I've had several jobs in the last year where I've been asked to look at and either suggest fixes or actually fix iPhone applications written by other developers. One thing that I've seen several times in code I've reviewed is something like this littered throughout the application:

[NSThreadsleepForTimeInterval:0.3];

This code causes the thread it's called from the do nothing for the specified length of time. Then I'll look through the code for some indication that the application is spawning threads. So far, in every case, the app hadn't spawned any threads, explicitly, or implicitly using NSOperationQueue. If you haven't detached any threads, and you call sleepForTimeInterval:, you are sleeping the application's main thread, and that is a very bad thing to do.

Usually, I see these sleepForTimeInterval: calls in applications that do some kind of asynchronous network communication. My guess is that the developers who wrote these applications came from Java, .Net, or some other language where network communication is commonly handled on a non-main thread. In those languages, it's not uncommon to see code that puts the network worker thread to sleep or into a loop to make it wait for a response and account for any potential lag time. It's not a great approach, but in these environments, it generally works.

In Cocoa and Cocoa Touch, however, unless you specifically spawn a thread and register your network communications with the spawned thread's run loop, your network communications using CFNetwork as well as any networking done using the built-in networking functionality that exists in many Cocoa classes all happens on the main thread.

Another related problem that I sometimes see is something like this:

- (IBAction)soSomething
{
NSData *data = [NSDatadataWithContentsOfURL:[NSURLurlWithString:@"http://foo.com/reallybigdatafile"]];
while(1)
{
// parse really big data file and break when done
}

}

This code has a few really bad things going on. It's important to keep in mind that IBAction methods always fire on the main thread. So, the first problem is the call to dataWithContentsOfURL:. This is what's called a blocking network operation, which means that calling this method will prevent any further code on this thread from executing until all the data has been received because the method will not return until that has happened. The same thing is true for all of the convenience constructors that contain withContentsOfURL: in their name. While you can probably get away with very limited use of these methods for very small pieces of data, you really should be only using asynchronous network calls in your apps. You can't predict how long network communications will take, even with tiny pieces of data. If the radios are powered down, EDGE connections can take several seconds to re-establish, which is long enough that your user will probably notice the freeze.

The second problem with this thread is the while loop. Small loops are often okay in action methods, but those that could potentially be large or where the length of the loop is simply impossible to know (which is typically the case with while (1) or while(TRUE) loops), you don't want to be doing the processing on the main thread.

Why All This is Bad


If you sleep the main thread, quite literally nothing can happen in your app except for background thread execution. If you haven't spawned any background threads, then pretty much nothing can happen at all. Your user interface will freeze up and your user won't be able to use the application. Buttons won't highlight when tapped and animations will freeze in place. But it's even worse than the interface freezing (which is certainly bad enough), all event processing and network communications will freeze up also. Anything that is handled by your application's main event loop simply doesn't happen while the main thread is asleep.

I have yet to see a situation where calling sleepForTimeInterval: on the main thread is a good idea.

If you perform a long-running operation on the main thread, your code will monopolize the main thread and the end result will be essentially the same as sleeping the main thread while your loop runs. No user interaction, no network communications, no animation.

If you want a good introduction on how to get stuff off your main thread, check out Dave Dribbin's blog post on concurrent operations. More iPhone 3 Development also devotes a full chapter to different types of concurrency.

Thursday, May 6, 2010

Another Record WWDC Sellout

You've probably already heard that my Twitter joke of pretending WWDC had sold out was ruined today by it actually selling out - after only eight days. Last year it sold in in just about a month, of course it was announced considerably earlier last year, but I still thought the higher ticket prices this year would slow it down a touch.

Actually, apparently, I didn't. On the day WWDC was announced, I made an off-hand, joking prediction of May 6 as the sellout day. Go me! Might just be the first Apple prediction I've gotten perfectly right.

Testing 3.x Apps on Phone Running Beta OS

#alttext#
Like many iPhone devs, I have more than one device that I use for testing. I have an iPod Touch that I usually leave at the current release version, an iPad WiFi that I leave at the current release version for the iPad, and I have an iPhone 3Gs that I keep on the bleeding edge beta release version. This way, I have a device to test and run stuff under the beta SDK and under the release SDK, and I keep both installed on my machine so I have the ability to check out and learn the next release of the SDK while still creating applications using the current release of the SDK.

Normally, this is a perfectly sufficient setup for my purposes, but today, it wasn't. I have a problem I'm trying to debug that happens when running on EDGE or on a really slow 3G connection; it never happens under WiFi. I'm doing a fix for a client that will need to go onto the App Store long before 4.0 goes GM, so I need to be working under 3.1.2.

In order to try and reproduce this problem, I have to be able to run the app on my phone because the iPod touch and iPad both only have WiFi connections so, therefore, I can't reproduce the problem there. I don't want to build against the beta SDK because this is a bug fix on an existing app, and the beta install doesn't include the current release SDK that I needs to build under, so I can't build a 3.1.2 app using the beta tools. This is probably done to discourage people from building apps for the App Store with the beta tools (which you really, really shouldn't do). The only problem is, OS versions have to match between the tools and phone, so I can't launch the GM Xcode and and debug apps on my iPhone on which I've installed the beta OS and if I run on my iPod touch, I can't reproduce the problem I need to debug because it doesn't happen under WiFi.

There's actually a solution, which is to create a symbolic link from SDK in the GM tools folder to the beta tools folder. So, in my case, I have GM tools installed at /Developer and the current beta release installed at /DevBeta. In order to compile a 3.1.3 application so I can test it on a phone that's been upgraded to 4.0, I can drop to the terminal and do this:
sudo ln -s /Developer/Platforms/iPhoneOS.platform/Developer/SDKs/iPhoneOS3.1.3.sdk \
/DevBeta/Platforms/iPhoneOS.platform/Developer/SDKs/iPhoneOS3.1.3.sdk
If I need to to run and test an application with a base SDK of 3.0 on a phone that's been upgraded to 4.0, instead I do this:
sudo ln -s /Developer/Platforms/iPhoneOS.platform/Developer/SDKs/iPhoneOS3.0.sdk \
/DevBeta/Platforms/iPhoneOS.platform/Developer/SDKs/iPhoneOS3.0.sdk
Do this with Xcode closed, then when you re-open your project with an older base SDK, it should work. All we're doing is creating a symbolic link from the beta tools directory to the appropriate SDK in the GM tool directory.

Now, be aware, this action is likely to be frowned upon by the Mothership; they excluded those SDKs for a reason. But, I haven't disclosed anything about the beta release other than its existence, which is widely known, and there are valid reasons to use the beta tools and the GM SDKs, so I though it worth sharing. Caveat emptor - do this at your own risk and don't get mad at me if it causes problems.

Wednesday, May 5, 2010

WWDC First Time Guide, 2010 Edition

Today, WWDC was announced. It's never been announced this late, so there's not a lot of time to prepare. On the other hand, there's a lot less time to wait. Because of the iPad, I'm expecting there to be a fair number of first timers at WWDC again this year, so I thought it was worth updating and re-posting my WWDC First Time Guide from last year.

Again, WWDC is different every year, so don't take anything written here as gospel, but hopefully these may help some of you.

Updated May 5th with two additional recommendations taken from the comments.

  1. Arrive on Sunday or Earlier. Registration is usually open most of the day on Sunday. You really, really want to get your badge, bag, and t-shirt on Sunday. The line for the keynote will start forming many hours before the doors to Moscone West open up on Monday. If you do not have your badge, you will almost certainly end up in an overflow room for the Keynote and may miss part of it. Even if you don't care about being in the main room, there's still a lot going on on Sunday, and you don't want to deal with the badge process on Monday.

  2. Do not lose your badge. If you lose it, you are done. You will spend your time crying on the short steps in front of Moscone West while you watch everyone else go in to get edumacated. Sure, you'll still be able to attend the after-hours and unofficial goings-on (except the Thursday night party, which is usually a blast), but you'll miss out on the really important stuff. No amount of begging or pleading will get you a replacement badge, and since they're likely to sell out, no amount of money will get you another one, either. And that would suck. Treat it like gold. When I'm not in Moscone West or somewhere else where I need the badge, I put it in my backpack, clipped to my backpack's keyper (the little hook designed to hold your keys so they don't get lost in the bottom of your bag). Yes, there have been isolated stories of people managing to convince a sympathetic conference worker to print them a new badge, but don't expect it. They're not supposed to, and most won't.

  3. Eat your fill. They will feed you two meals a day, you're on your own for dinner. Breakfast starts a half-hour before the first session, and it's probably going to be a continental breakfast - fruit, pastries, juice, coffee, donuts, toast, and those round dinner rolls that Californians think are bagels, but really aren't. If you're diabetic, need to eat gluten-free, or are an early riser, you'll probably want to eat before-hand. Lunch used to be (IIRC) a hot lunch, but two or three years ago they switched to boxed lunches. They are pretty good as far as boxed lunches go, but they are boxed lunches. A lot of people complain about them and choose to go to a nearby restaurant during the lunch break, which is pretty long - at least 90 minutes.

  4. Party hard (not that you have a choice). There are lots of official and unofficial events in the evening. There's usually a CocoaHeads meeting at the Apple Store. It fills up crazy fast, so go early if you go. It's usually competing with several other parties, but it starts earlier than most events and finishes early enough for people to go to other parties when it's done. Best bet is to follow as many iPhone and Mac devs on Twitter that you can - the unofficial gatherings happen at various places downtown, often starting with a few "seed crystal" developers stopping for a drink and tweeting their whereabouts. The unofficial, spontaneous gatherings can be really fun and a great opportunity. The parties often start before WWDC - there are usually a few on Sunday, and there have been ones as early as Saturday before. The Harlot at 111 Minna is a common place for official parties, as are Jillians in the Metreon, and the Thirsty Bear on Howard. For informal gatherings, Eddie Rickenbockers, the Chieftan, the House of Shields, and pretty much any other bar within stumbling distance of Moscone West. As we get closer, there will be lists and calendars devoted to all the events and parties. Some are invite-only, but many are first-come, first-serve. Although there's a lot of drinking going on, these are worth attending even if you don't drink. Great people, great conversations... good times.

    At some point, one or more lists will pop up to track the official parties, gatherings, meet-ups, and BOF (birds of a feather meetings - meet-ups for people interested in a particular subject).

  5. Take good notes. You are going to be drinking knowledge from a firehose there. The information will come at you fast and furious. As an attendee, you will get all the session videos on ADC on iTunes, but it takes a little while before they become available, so the things you need to know now, write down. Last year, the videos took less than a month to come out, so hopefully they will be just as fast this year, but even so, make sure you write down the information you need immediately.

  6. Buy SubEthaEdit Last year, people started taking communal notes using SubEthaEdit, an awesome collaborative note-taking tool, and it worked out really, really well. My notes from last year are ten times better than from previous years. With SubEthaEdit, you don't have to type fast enough to catch every detail. Instead, the audience works as a team and everybody gets great notes. SubEthaEdit pays for itself in one WWDC, especially considering you can see notes being taken in other sessions, not just your own. Note: I've been informed that Panic's Coda is also compatible with SubEthaEdit's colaborative note taking

  7. Labs rule. If you're having a problem, find an appropriate lab. One of the concierges at any of the labs can tell you exactly which teams and/or which Apple employees will be at which labs when. If you're having an audio problem, you can easily stalk the Core Audio team until they beat the information into your skull, for example (that example is from personal experience - those guys are awesome, by the way). It's unstructured, hands-on time with the people who write the frameworks and applications. People start remembering the labs later in the week it seems, but early on, you can often get an engineer all to yourself.

  8. Buddy up, divide and conquer There will be at least a few times when you want to be at more than one presentation at the same time. Find someone who's attending one and go to the other (Twitter is a good way to find people), then share your notes.

  9. Make sure to sleep on the plane. You won't get many other chances once you get there. Everybody is ragged by Friday, some of us even earlier. Everyone remains surprisingly polite given how sleep-deprived and/or hungover people are.

  10. Thank your hosts. The folks at Apple - the engineers and evangelists who give the presentations and staff the labs, kill themselves for months to make WWDC such a great event. So, do your mother proud and remember your manners. Say thank you when someone helps you, or even if they don't. And if you see one of them at an after hours event, it's quite alright to buy them a beer to say thanks.

  11. Remember you're under NDA. This one is hard, especially for me. We see so much exciting amazing stuff that week that it's natural to want to tweet it, blog it, or even tell the guy handing out advertisements for strip joints on the corner all about it. Don't. Everything, from morning to night except the Keynote and the Thursday night party are under NDA.

  12. Brown Bag it. Most days there are "brown bag" sessions. These are speakers not from Apple who give entertaining, enlightening, or inspiring talks at lunchtime. Check the schedule, some of them are bound to be well worth your time.

  13. Monday, Monday I don't know what to say about Monday. Last year, people started lining up at midnight the night before (again). I'm typically on East coast time and usually walk over around 4:15 to see what's going on. Two years ago, I stayed and became an insane person myself and did the whole line thing. Last year, I visited for a while and then went and had breakfast. If you're not in line early, you will still see the keynote, though you may be in an overflow room watching it on a big video screen. If you straggle too much, they may start before you get in the room (happened to me last year).

    Waiting in line is not really my thing, but you do get to talk to a lot of very cool people while waiting in line, and there is a sense of camaraderie that develops when you do something silly with other people like that. Some people probably want me to suggest what time to get in line. I have no idea. Most people will get into the main room to see the Keynote. There will be some people diverted to an overflow room, but because the number of attendees is relatively low and the Presidio (the keynote room) is so big, it's a tiny percentage who have to go to the overflow rooms (maybe the last 1,500 or so). On the other hand, you'll actually get a better view in the overflow rooms unless you get there crazy early - you'll get to watch it in real time on huge screens and you'll get to see what's happening better than the people at the back of the Presidio. So, go when you want to. If you want to get up early and go be one of the "crazy ones", cool! If you want to get up later, you'll still get to see the keynote sitting in a comfy room with other geeks.

  14. Park it once in a while There will be time between sessions, and maybe even one or two slots that have nothing you're interested in. Or, you might find yourself just too tired to take in the inner workings of some technology. In that case, there are several lounges around where you can crash in a bean bag chair, comfy chair, or moderately-comfy chair. There is good wi-fi throughout the building and crazy-fast wired connections and outlets in various spots on all floors. So, find a spot, tweet your location, and zone out for a little while or do some coding. You never know who you might end up talking with. If you move around too much, well, let's just say a moving target is harder to hit than a stationary one.

  15. Twitter is invaluable, but don't expect it to stay up during the keynote. There's really no better way to hook up with people you didn't travel with than Twitter. Two years ago, we overwhelmed twitter during the keynote. Last year it fared okay, though there were some delays and hiccups.

  16. It's okay to leave. Don't worry if a few minutes into a session you decide that you've made a horrible mistake and it's too boring/advanced/simple/etc. Just get up and leave quietly and wander to a different session. Nobody is going to be offended if you leave politely and without causing a disturbance.

  17. Bring proof of age on Thursday night. The official party is always on Thursday night, and it's always a blast. There's good food, good drink, great company, and usually a pretty good band. It was the Cake last year, Bare Naked Ladies the year before. They are pretty strict about making sure only people who are over 21 get alcohol. So, if you want to have a drink or five on Thursday, don't leave your license or passport in your hotel room.

  18. It's okay to take breaks. Your first time, you're going to be tempted to go to every session you possibly can. Somewhere around Wednesday or Thursday, though, that effort combined with lack of sleep, is going to take its toll on you. If you're too tired or overwhelmed to process information, it's okay to hole up on a couch or at a table instead of going to a session, or even to go back to your hotel (you did get a close one, right?). In fact, it's a darn good idea to map out a few "sacrificial" time slots that won't feel bad about missing just in case you need a break. You don't want to burn out and then miss something you are really interested in. And some of the best, more advanced sessions fall at the end of the week, so don't shoot your whole wad early in the week.

  19. Get a close hotel If at all possible, try and get a hotel within two block and definitely not more than five blocks away from Moscone West. Five blocks doesn't seem like a lot, but it can become quite a hassle, especially if you're South of Moscone West because you'll be climbing up a pretty decent hill in one direction.

  20. Official Evening Events In addition to the Thursday night Beer Bash, there are other official activities in the evening that are very entertaining and usually happen in the early evening before the parties really get going. The two stalwarts are the Apple Design Awards and Stump the Chumps, which is an Apple trivia game-show like event with notable tech luminaries and former Apple employees. Lots of sharp wits and deep knowledge of Apple make for some good entertainment. There used to also be a Monday night reception and cocktail hour, but if memory serves, it didn't happen last year.

  21. Take the BART If you're flying into either SFO or OAK and are staying near Moscone West (or near any BART station) there's really no reason to bother with renting a car or taking a cab from the airport. Just get off at the Powell Street station and walk up 4th street. Moscone West will be four blocks up the hill on your right.

  22. Bring a Sweatshirt or Jacket A lot of first-timers assume that it's California in the summer so it's going to be hot. Well, it could be, during the middle of the day, but look up Mark Twain's quote about San Francisco in the summer. It can be downright cold in San Francisco in the summer time, especially in the evenings and early morning. Bring a sweatshirt or light jacket, and wear layers because the temperature differential over the course of the day can be forty or fifty degrees.

  23. Sample Code Many sessions will have sample code, usually downloadable from the schedule or class descriptions web pages. The sample code will stay up for a while, but will not stay around forever, so it's a good idea to download any code samples you want as soon as you can. Edit: It looks like starting with 2009, you can get to the old source code for years you attended by logging in to ADC on iTunes.


Have more suggestions for first-timers? Add them to the comments.

Monday, May 3, 2010

NSStream: TCP and SSL

In Chapter 9 of More iPhone 3 Development, we showed how to use Bonjour and NSInputStream / NSOutputStream to do network communications. In that case, it was for making a simple networkable game, but the technique is essentially the same for any kind of low-level network communications.

On Mac OS X, NSStream, the superclass of both NSInputStream and NSOutputStream, has a class convenience method called getStreamsToHostNamed:port:inputStream:outputStream which creates a stream pair to a specified remote host. For some reason unbeknownst to me¹, Apple chose not to include this convenience method in the iPhone SDK. The underlying functionality is still there in the iPhone SDK, they just removed the method that make it easy to establish the streams. Apple rectified that situation shortly thereafter by issuing Technote TN QA1652, which gives a category on NSStream that restores the missing functionality.

Using this method really couldn't be easier. In our TicTacToe application, we could have established an OnlineSession object to another game specified by IP address and port rather than through Bounjour, like so:

    NSInputStream *is;
NSOutputStream *os;
[NSStream getStreamsToHostNamed:address
port:port
inputStream:&is
outputStream:&os
]
;
OnlineSession *session = [OnlineSession initWithInputStream:is outputStream:os];

Of course, there would still need to be an instance of TicTacToe running on the remote client listening for connections. With internet play, you're generally going to need some way of finding the address and port of the machine to connect to, but if a game is running and isn't firewalled, that will connect you to it. In fact, you can use this same technique for pretty much any kind of low-level network communications.

One thing that's not obvious, however, is how you can encrypt your network communications using SSL. It's pretty easy, but there is a significant gotcha that's worth mentioning. Let's look at OnlineSession's initWithInputStream:outputStream: and then add SSL support for it. Here is the original:

- (id)initWithInputStream:(NSInputStream *)theInStream outputStream:(NSOutputStream *)theOutStream
{
if (self = [super init]) {

inStream = [theInStream retain];
outStream = [theOutStream retain];

[inStream scheduleInRunLoop:[NSRunLoop currentRunLoop] forMode:NSDefaultRunLoopMode];
[outStream scheduleInRunLoop:[NSRunLoop currentRunLoop] forMode:NSDefaultRunLoopMode];

inStream.delegate = self;
outStream.delegate = self;

if ([inStream streamStatus] == NSStreamStatusNotOpen)
[inStream open];

if ([outStream streamStatus] == NSStreamStatusNotOpen)
[outStream open];

packetQueue = [[NSMutableArray alloc] init];

}

return self;
}

That version creates a plaintext, unencrypted connection to the remote server. The way that we enable SSL encryption is to simply use setProperty:forKey: on both streams, setting the key NSStreamSocketSecurityLevelKey to a value that specifies the version of SSL to use. If you want to tell NSStream to use the highest version supported in common with the remote connection, specify NSStreamSocketSecurityLevelKey. That's what you'll usually want. Here's a new version of our init method that lets us specify whether to use SSL or not:
- (id)initWithInputStream:(NSInputStream *)theInStream outputStream:(NSOutputStream *)theOutStream useSSL:(BOOL)useSSL 
{
if (self = [super init]) {

inStream = [theInStream retain];
outStream = [theOutStream retain];

[inStream scheduleInRunLoop:[NSRunLoop currentRunLoop] forMode:NSDefaultRunLoopMode];
[outStream scheduleInRunLoop:[NSRunLoop currentRunLoop] forMode:NSDefaultRunLoopMode];

inStream.delegate = self;
outStream.delegate = self;

if ([inStream streamStatus] == NSStreamStatusNotOpen)
[inStream open];

if ([outStream streamStatus] == NSStreamStatusNotOpen)
[outStream open];

packetQueue = [[NSMutableArray alloc] init];

if (useSSL)
{
[inStream setProperty:NSStreamSocketSecurityLevelNegotiatedSSL
forKey:NSStreamSocketSecurityLevelKey
]
;
[outStream setProperty:NSStreamSocketSecurityLevelNegotiatedSSL
forKey:NSStreamSocketSecurityLevelKey
]
;

}

}

return self;
}

And, we're done! Well, at least insofar as the NSStream documentation would have you believe. This code will work if everything is perfect. However, by default, SSL support in NSStream is a little paranoid. It won't, for example, use a self-signed certificate or an expired certificate to establish a secure connection. NSStream does a number of validity checks when establishing the secure connection, and if they don't all pass, the streams appear to be valid, but no data gets sent or received. This is somewhat frustrating, and it could be there's a way to find out when the secure connection failed, but I haven't been able to find it in the documentation, or using Google. There is an error domain declared for these errors (NSStreamSocketSSLErrorDomain), but in my experimentation, no errors gets generated, the streams even accept bytes for transfer, but nothing happens².

When it comes to security, a little paranoia is good, but there are many situations where all you want is the encryption provided by SSL, and you don't really care about whether the root certificate is valid (the root certificate identifies the certificate authority that issued the certificate). If you're doing an e-Commerce transaction, then you almost certainly want to make sure the certificate is valid and was issued by a valid authority. But if all you're trying to do is provide a little privacy from prying eyes, a self-signed certificate is often perfectly acceptable.

Unfortunately, NSStream doesn't provide a way to say "don't check the root certificate". Fortunately, CFStream does, and remember: CFStream and NSStream are toll-free bridged.

The way we can turn off these validity checks is by creating an instance of NSDictionary. In this dictionary, we'll specify Boolean values for a number of system-defined key values like kCFStreamSSLAllowsAnyRoot, kCFStreamSSLAllowsExpiredCertificates, and kCFStreamSSLValidatesCertificateChain, specifying either YES or NO as appropriate to your situation. SSL also does verification on the name of the remote peer. We can turn that off by overriding the peer name using the key kCFStreamSSLPeerName and setting it to null (well, technically, kCFNull).

Once we have this dictionary, we can feed it to our stream pair by casting them to their CF counterpart using CFReadStreamSetProperty and CFWriteStreamSetProperty. If we wanted to turn off all the validity checks and allow any certificate signed by any root certificate, we would do this:

- (id)initWithInputStream:(NSInputStream *)theInStream outputStream:(NSOutputStream *)theOutStream useSSL:(BOOL)useSSL 
{
if (self = [super init]) {

inStream = [theInStream retain];
outStream = [theOutStream retain];

[inStream scheduleInRunLoop:[NSRunLoop currentRunLoop] forMode:NSDefaultRunLoopMode];
[outStream scheduleInRunLoop:[NSRunLoop currentRunLoop] forMode:NSDefaultRunLoopMode];

inStream.delegate = self;
outStream.delegate = self;

if ([inStream streamStatus] == NSStreamStatusNotOpen)
[inStream open];

if ([outStream streamStatus] == NSStreamStatusNotOpen)
[outStream open];

packetQueue = [[NSMutableArray alloc] init];

if (useSSL)
{
[inStream setProperty:NSStreamSocketSecurityLevelNegotiatedSSL
forKey:NSStreamSocketSecurityLevelKey
]
;
[outStream setProperty:NSStreamSocketSecurityLevelNegotiatedSSL
forKey:NSStreamSocketSecurityLevelKey
]
;

NSDictionary *settings = [[NSDictionary alloc] initWithObjectsAndKeys:
[NSNumber numberWithBool:YES], kCFStreamSSLAllowsExpiredCertificates,
[NSNumber numberWithBool:YES], kCFStreamSSLAllowsAnyRoot,
[NSNumber numberWithBool:NO], kCFStreamSSLValidatesCertificateChain,
kCFNull,kCFStreamSSLPeerName,
nil
]
;

CFReadStreamSetProperty((CFReadStreamRef)inStream, kCFStreamPropertySSLSettings, (CFTypeRef)settings);
CFWriteStreamSetProperty((CFWriteStreamRef)outStream, kCFStreamPropertySSLSettings, (CFTypeRef)settings);

}

}

return self;
}

If you're attempting to use SSL, but your network connection doesn't seem to do anything, try turning off the validity checks one at a time to see if that changes your result, or use the code above to turn them all off, which should at least tell you if the problem you're having is a failure to establish a secure connection. Be careful shipping applications with these checks turned


1 The reason is now knownst to me. The original method used NSHost which isn't available on the iPhone - thanks Chris!
2 If anyone knows how to determine when this is happening, please let me know and I'll post the information. I'm sure there has to be a way to detect the failure to establish an encrypted connection so you can "fallback" to a less secure option if you want to, but I haven't found it yet

Saturday, May 1, 2010

Validate Build Product

In the last post, I mentioned Xcode 3.2's new Validate option that runs the same checks the App Store Review Team will use before looking at the content of your app and which may be used by Build and Archive (or any other Build command, for that matter), I probably should have mentioned what determines whether it will get run. It's your project settings. To turn it on or off, select Edit Project Settings from the Project menu, and it's under the Build Options, and it's just a checkbox you can turn on or off.

Screen shot 2010-05-01 at 10.14.00 AM.png

I would recommend not waiting until App Store submission to run validate. Do it before you send to testers or to your client. It will allow you to address problems before your app gets tested, reducing the need for regression testing.

Xcode 3.2: Build and Archive

One aspect of iPhone development that I'm no big fan of is ad hoc distribution. In Xcode 3.2, Apple added a new feature to Xcode that makes ad hoc distribution more than a fair bit better. But, for the first few weeks of using Xcode 3.2, I didn't even notice this item. I know many of you probably have, but I've talked to enough people that also missed it, that I figured it's worth a short post.

This new item lives under the Build menu, but frankly, I don't use menus much in Xcode. I use a very custom set of key bindings and have all my regular tasks' key commands memorized. The new option is called Build and Archive.

I still wish Apple would get rid of the whole process, but it's unlikely they will in the near future. In light of the situation, this makes life much, much better. It's a pretty good compromise between Apple's desires and the needs of developers, all in all.

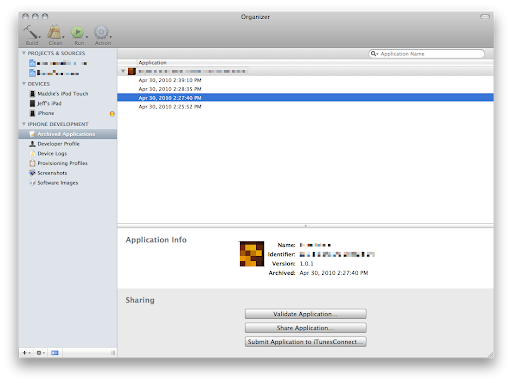
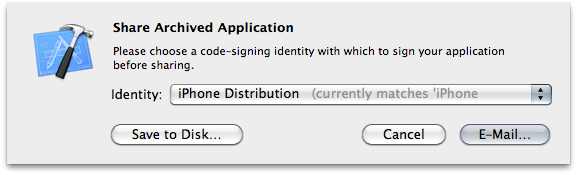
Build and Archive builds your application, code signs it, and stores the application folder along with its symbols file (which you need to decode crash logs generated by ad hoc or release builds). Xcode's Organizer window gives you ready access to any previous build, and lets you e-mail an ad hoc build packaged up as an .ipa file with the mobile provisioning profile you compiled with embedded right into the application. This allows your clients or tester to simply drag the generated .ipa file into iTunes. The organizer will even generate an e-mail with the .iap embedded in it.

Screen shot 2010-05-01 at 9.43.08 AM.png


Screen shot 2010-05-01 at 9.45.42 AM.png


As part of Build and Archive, Xcode checks your application to make sure it's code signed and provisioned properly. It may also (depending on your project settings) automatically run the new Validate feature that checks to make sure your application is valid for app store submission. This is the same check that the app review team will run on your app before actually looking at it. The details of what Validate checks are not documented, but in general terms, it will make sure everything is okay and that you haven't used anything you shouldn't have used. It's not a guarantee that your app won't get rejected because there's still the manual review for content and HIG, but if your app passes validation, that's one less possible obstacle between you and the app store. In other words, make sure you validate your apps before submitting them.

One thing to note, however, is that when you use Validate for ad hoc builds instead of building for submission to the app store (and I recommend that you do so that you find problems before testing rather than after), your app may fail one of the Validate checks. If you get this warning message when using either Build and Archive or Build and Validate with an ad hoc build:
warning: Application failed codesign verification. The signature was invalid, or it was not signed with an Apple submission certificate. (-19011)
You might be fine (assuming you received no other warnings or errors). The difficult thing is that this warning can be generated by more than one specific problem, so there's no way to know for sure whether this needs to be addressed other than to try and install the generated .ipa file on a non-development phone. You may (will?) get this warning with ad hoc builds even if the build is fine because you don't use an "Apple submission certificate" for ad hoc builds.

One of the best things you can do is to have a second iPhone or iPod touch that's not used for development (ever) that you can use to test ad hoc distributions. Even a second-hand, cheap iPod touch is sufficient since all you're testing is that the install works If you do this, make sure you add the UDID of this unit to your ad hoc distribution profiles, but not to your development profile.

When you see this warning with Validate when building using an Ad Hoc Distribution configuration, don't panic, but do try and install it on a machine that doesn't have your development profile installed before sending it to a tester or client.