Thursday, May 20, 2010
WWDC Trip to Cupertino Update
There has been quite a lot of interest shown in traveling down to One Infinite Loop to go to the Company Store on the Sunday before WWDC. I'm going to put something together this weekend to serve as a "signup sheet". I'm going to solicit information about who has cars and how many spare seats there are, what time people are arriving, etc. We'll give people a few days to sign up, then we'll formulate a plan for getting as many people down there as we possibly can.

Wednesday, May 19, 2010
Improved Gradient Buttons
I've been playing around a bit, improving my imageless gradient button class. The new version allows you to specify the gradient for the normal and highlighted state by populating two arrays, one with the colors that make up the gradients and another with the relative location for each color. I've gotten rid of the abstract parent class and individual child classes and all the functionality is now contained in a single class.
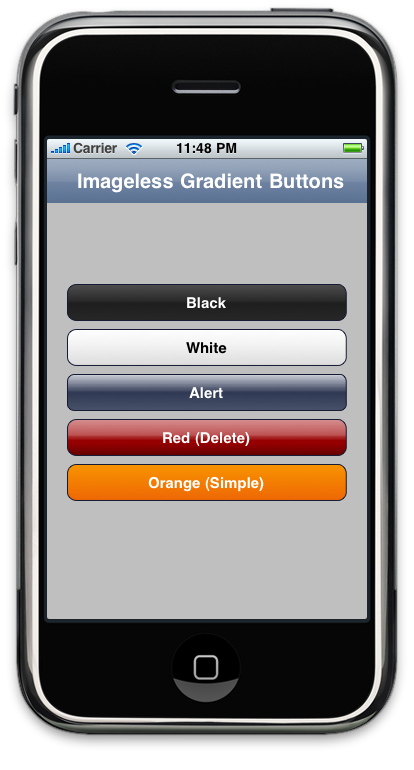
There are five built-in styles which can be seen in the image above, or you can manually set the gradient to any value you'd like. You can download the source codes from the Google code page. There are no restrictions or limitations on its use.
The easiest way to use these is to add a UIButton instance to your view in Interface Builder, then change the underlying class from UIButton to GradientButton. Because there's no way to create IB palettes for iPhone classes, you'll also have to implement viewDidLoad and set the gradient or use the existing methods there.
There are five built-in styles which can be seen in the image above, or you can manually set the gradient to any value you'd like. You can download the source codes from the Google code page. There are no restrictions or limitations on its use.
The easiest way to use these is to add a UIButton instance to your view in Interface Builder, then change the underlying class from UIButton to GradientButton. Because there's no way to create IB palettes for iPhone classes, you'll also have to implement viewDidLoad and set the gradient or use the existing methods there.
Pre-WWDC Cupertino Trip
There's been a bunch of discussion over Twitter today about getting down to One Infinite Loop on Sunday, June 6th, the day before WWDC starts. Typically, The Company Store (Apple's on-campus store, open to the public) is open that day even though they are not usually open on the weekends. I called the store this morning, and they are going to be open again this year from noon to 5:00pm.
It is not possible to get all the way from San Francisco to Apple's Corporate HQ completely on public transit, so the logistics could be a little daunting, but one possibility would be to charter a bus down. In the long run, it might save some money while being faster and more comfortable.
Chime in in the comment section if you're interested in going from downtown San Francisco down to Cupertino on Sunday, June 6th and don't have a way to get there yet. If there's enough interest, I'll look into what it would cost to get arrange transportation based on the number of interested people.
The other option would be to set up a big carpool.
It is not possible to get all the way from San Francisco to Apple's Corporate HQ completely on public transit, so the logistics could be a little daunting, but one possibility would be to charter a bus down. In the long run, it might save some money while being faster and more comfortable.
Chime in in the comment section if you're interested in going from downtown San Francisco down to Cupertino on Sunday, June 6th and don't have a way to get there yet. If there's enough interest, I'll look into what it would cost to get arrange transportation based on the number of interested people.
The other option would be to set up a big carpool.
Tuesday, May 18, 2010
Can't Make it to WWDC? Go to NSConference Mini!
I really should have mentioned this earlier. The late announcement of WWDC this year made it difficult or impossible for many European developers who normally come to WWDC to make it this year. As a result, Scotty of the Mac Developer Network has decided to hold an "NSConference Mini" in the U.K. the same week as WWDC. It's a one-day conference being held in Birmingham, UK on June 11th (the final day of WWDC).
As you probably know, I will be going to WWDC. But I'm also a big fan of NSConference. If you can't afford to make the hop across the pond or, for any other reason, didn't get a ticket, you should give very serious consideration to buying a ticket to NSConference Mini. I can virtually guarantee that the sessions will be informative and the company will be excellent. Scotty and his crew do a really great job in every way.
It looks like the details are still firming up and attendees will get to vote on which of the proposed sessions will be included, so if you want a say in the agenda, it's better to sign up sooner rather than later.
As you probably know, I will be going to WWDC. But I'm also a big fan of NSConference. If you can't afford to make the hop across the pond or, for any other reason, didn't get a ticket, you should give very serious consideration to buying a ticket to NSConference Mini. I can virtually guarantee that the sessions will be informative and the company will be excellent. Scotty and his crew do a really great job in every way.
It looks like the details are still firming up and attendees will get to vote on which of the proposed sessions will be included, so if you want a say in the agenda, it's better to sign up sooner rather than later.
Programmatic Gradient Buttons
Thanks to a little insomnia, I decided to play around a little more with doing a programmatic gradient button. I started to create another gradient button, realized that the code was going to be 90% the same between the two style gradient buttons, so did a little refactoring. The result is a class you can subclass to easily make new gradient buttons. All you have to do is override three methods to specify the gradient to use when the button is in its normal state, the gradient to use when the button is in highlighted (pressed) state, and the corner radius. Here's what the alert-style button looks like now:
BlueGradientButton.h
BlueGradientButton.m
Adding new gradient buttons is relatively simple, since all the heavy drawing is handled in the superclass based on the values you return in these three methods. You can check out the sample project that has two gradient buttons: one that simulates the alert style button and which also works for regular bar buttons, and one that simulates the red delete button. I'll likely add more styles later.
One important notice - the CFGradientRef returned by the two methods should not be released, the super class will release it when it's done. This is a bit of an oddity, but there is no CFGradientAutorelease() function, only a CFGradientRelease() function. I changed the name to start with "create". In the Core Foundation memory management rules, functions that use create return an object with retain count of 1. There probably is a more elegant way to deal with this situation, but none occurred to me and I didn't want to have to mess around with a callback to release the memory given how straightforward the usage is here.
You can download the project here. I've also added the project to Google Code if anyone wants to contribute additional elements.
BlueGradientButton.h
BlueGradientButton.m
Adding new gradient buttons is relatively simple, since all the heavy drawing is handled in the superclass based on the values you return in these three methods. You can check out the sample project that has two gradient buttons: one that simulates the alert style button and which also works for regular bar buttons, and one that simulates the red delete button. I'll likely add more styles later.
One important notice - the CFGradientRef returned by the two methods should not be released, the super class will release it when it's done. This is a bit of an oddity, but there is no CFGradientAutorelease() function, only a CFGradientRelease() function. I changed the name to start with "create". In the Core Foundation memory management rules, functions that use create return an object with retain count of 1. There probably is a more elegant way to deal with this situation, but none occurred to me and I didn't want to have to mess around with a callback to release the memory given how straightforward the usage is here.
You can download the project here. I've also added the project to Google Code if anyone wants to contribute additional elements.
Monday, May 17, 2010
Some Good Advice
In the comments of my previous post, Joe Conway, one of the fine instructors over at the Big Nerd Ranch, co-author of one of the newer books on the iPhone SDK, and all-around nice guy had some really good suggestions. One of his comments was (I'm paraphrasing) "don't use an image when the image can be easily drawn with Core Graphics.
Joe posted some code to replace the gradient background in the previous post. Admonished for my laziness and inspired to make the code better, I incorporated his suggestion. I then finally went and bought Opacity (a vector drawing program that will output Core Graphics code) and used it to create a subclass of UIButton that will draw itself in a style similar to the buttons in UIAlertView using only Core Graphics calls, no images. These buttons can be drawn at any size and will draw correctly without the need for any images.
Once I've mastered Opacity, I'd like to replace the alert background image with Core Graphics code. Joe's also got some suggestions in his comments about how to make the status bar gray out, which I may incorporate into a future version.
If you're curious, you can check out the revised project incorporating Joe's suggestion as well as the imageless version of the alert button.
If you do any serious amount of iPhone work, you really should check out Opacity. If you're a hobbyist, they have a less-expensive version that may suit your needs.
Thanks Joe!
Joe posted some code to replace the gradient background in the previous post. Admonished for my laziness and inspired to make the code better, I incorporated his suggestion. I then finally went and bought Opacity (a vector drawing program that will output Core Graphics code) and used it to create a subclass of UIButton that will draw itself in a style similar to the buttons in UIAlertView using only Core Graphics calls, no images. These buttons can be drawn at any size and will draw correctly without the need for any images.
Once I've mastered Opacity, I'd like to replace the alert background image with Core Graphics code. Joe's also got some suggestions in his comments about how to make the status bar gray out, which I may incorporate into a future version.
If you're curious, you can check out the revised project incorporating Joe's suggestion as well as the imageless version of the alert button.
If you do any serious amount of iPhone work, you really should check out Opacity. If you're a hobbyist, they have a less-expensive version that may suit your needs.
Thanks Joe!
Custom Alert Views
Quite some time ago, I posted a way to accept text input using an alert view. The problem with that technique is that it relies on one of Apple's private APIs. I've had many people ask me how to use that technique without getting rejected in the review process. The short answer is: you can't.
What you can do, however, is create your own class that simulates the behavior of UIAlertView. You can find a sample implementation of the technique discussed in this post by downloading this project. In this simple example, we're going to create an alert view that lets the user enter a value into a single text field. The same technique can be used to present any view that you can build in Interface Builder. From a programming perspective, you will not get rejected for using private APIs if you use this technique, but be aware that you can still get rejected for HIG violations, so make sure you're familiar with the HIG.
There are many ways to mimic the behavior of the UIAlertView. One of the most common ways I've seen is to simply design an alert view in the nib of the view controller that needs to present it. This works, but it's a bit messy and pretty much completely non-reusable.
A better approach is to design the alert view as its own view controller and nib pair. We can even model it after UIAlertView's fire-and-forget approach so that the calling code can look exactly like code to create and display a UIAlertView. Before we get started, we need a few resources.
You've probably noticed that when you use an alert view, the active view grays out a bit. I don't know for sure how Apple has accomplished this, but we can simulate the behavior using a PNG image with a circular gradient that goes from 60% opaque black to 40% opaque black:

We also need a background image for the alert view. Here's one I hacked out in Pixelmator
For your own alerts, you might need to resize or turn this into a stretchable image. For simplicity's sake, I just made it the size I want it. We also need buttons. Again, in a real example, you might want to turn these into stretchable images, but I just kept things simple by making the image the size I wanted it:

The next thing we need is some animation code. We could, of course, create the CAAnimation instances right in our class, but I'm a big fan of both code reuse and Objective-C categories, so instead of doing that, I've created a category on UIView that will handle the two animations we need. One animation "pops in" a view and will be used to show the alert view, the other fades in a view and will be used for the gray background image. The two animations happen at the same time so that when the alert has fully popped into view, the background view is grayed out.
The keyframe timings on the "pop in" animation code are not quite a 100% match for Apple's animation, so if anybody wants to tweak the keyframe values to make a closer match, I'd be happy to update the code with the "correct" values. Here is the category I created to hold the animations:
UIView-AlertAnimations.h
UIView-AlertAnimations.m
As you can see, I've provided two versions of each animation, one that accepts an animation delegate and one that doesn't. This allows the calling code to set an animation delegate so it can be notified of things like when the animation finishes. We'll use a delegate for one of our animations, but we might as well have the option with both.
The next thing we need to do is create the view controller header, implementation, and nib files. In my sample code, I've named the class CustomAlertView. It may seem odd that I giving a view controller class a name that makes it sound like a view instead of something like CustomAlertViewController. You can feel free to name yours however you wish, but this controller class will actually mimic the behavior of UIAlertView and I wanted the name to reflect that. I debated with myself over the name for a bit, but ultimately decided that CustomAlertView felt better since the name would provide a clue as to how to use it. If it feels dirty to you to "lie" in the class name, then by all means, name yours differently.
We're going to need some action methods and some outlets so that our controller and nib file can interact. One outlet will be for the background image, another for the alert view itself, and one for the text field. The latter is needed so we can tell the text field to accept and resign first responder status. We'll use a single action method for both of the buttons on the alert, and we'll use the button's tag value to differentiate between the two buttons.
Because we're implementing fire-and-forget, we also need to define a protocol containing the methods the delegate can implement. Since the alert is designed to accept input, I've made the delegate method used to receive the input @required, but the other method (called only when cancelled) @optional. The enum here is just to make code more readable when it comes to dealing with the button tag values.
CustomAlertView.h
Once the header file is completed and saved, we can skip over to Interface Builder and create our interface. I won't walk you through the process of building the interface, but I'll point out the important things. Here's what the view will looks like in Interface Builder:

Some important things:
Once the interface is created, all that's left to do is implement the controller class. Here is the implementation; I'll explain what's going on in a moment:
CustomAlertView.m
So, what're we doing here? First, we start by importing the category with our alert view animations and also QuartzCore.h which gives us access to all the datatypes used in Core Animation.
Next, we declare a class extension with a single method. By putting this method here, we can use it anywhere in our class without getting warnings from the compiler yet we do not advertise the existence of this method to the world. This is, essentially, a private method. In a dynamic language like Objective-C, there are no truly private methods, but since the method is not declared in the header file, that's our way of saying "this is ours, don't touch". This method, which you'll see in a moment, will be called after the alert has been dismissed to remove it from its superview. We don't want to remove it until after the fade-out animation has finished, which is why we've declared a separate method.
After we synthesize our properties, the first method we write is show. This is the method that gets called to, well… show the alert. I matched the method name used in UIAlertView and also made it an IBAction so that it can be triggered directly inside a nib file.
The weirdest part of this method is that it actually retains self. This is something you're generally not going to want to do. Since we've implemented our alert view as a view controller instead of a UIView subclass like UIAlertView, we need to cheat a little because a view controller is not retained by anything by virtue of its view being in the view hierarchy. This isn't wrong - we're going to bookend our retain with a release (well, actually, an autorelease) so no memory will leak, but it is unusual and not something you're going to want to use in very many places. When you retain self, you need to take a long hard look at your code and make sure you have a darn good reason for doing it. In this instance, we do.
After retaining, we grab a reference to the window by way of the application delegate and add our view to the window, matching its frame. Then we call the two animation methods we created earlier to fade in the image with the circular gradient and "pop" in the alert view:
The next action method we write is the one that gets called by the two buttons on the alert. Regardless of which button was pushed, we want the text field to resign first responder status so that the keyboard disappears, and we want the alert to fade away. We're going to use implicit animations this time and then use performSelector:withObject:afterDelay: to trigger our private method that will remove the view from its superview. After that, we check sender's tag value to see which delegate method to notify.
The viewDidUnload and dealloc are bog standard, so there's no point in discussing them. The next method after those is our "private" method. It does nothing more than remove the now invisible alert view from the view hierarchy and autoreleases self so that the view controller will be released at the end of the current run loop iteration. We don't want to use release because we really don't want the object disappearing while one of its method is executing:
Earlier, when we created the "pop in" animation, we specified self as the delegate. The next method we implement is called when the "pop in" animation completes by virtue of that fact. All we do here is make sure the keyboard is shown to the user and associated with our text field. We do all that simply by making the text field the first responder:
Finally, we implement one of the text field delegate methods so that when the user presses the return key on the keyboard, it dismisses the dialog.
At this point, we're done. We can now use this custom alert view exactly the same way we use UIAlertView:
As I stated earlier, you can use this same technique to present anything you can build in Interface Builder, and the result will be a highly-reusable alert object.
What you can do, however, is create your own class that simulates the behavior of UIAlertView. You can find a sample implementation of the technique discussed in this post by downloading this project. In this simple example, we're going to create an alert view that lets the user enter a value into a single text field. The same technique can be used to present any view that you can build in Interface Builder. From a programming perspective, you will not get rejected for using private APIs if you use this technique, but be aware that you can still get rejected for HIG violations, so make sure you're familiar with the HIG.
There are many ways to mimic the behavior of the UIAlertView. One of the most common ways I've seen is to simply design an alert view in the nib of the view controller that needs to present it. This works, but it's a bit messy and pretty much completely non-reusable.
A better approach is to design the alert view as its own view controller and nib pair. We can even model it after UIAlertView's fire-and-forget approach so that the calling code can look exactly like code to create and display a UIAlertView. Before we get started, we need a few resources.
You've probably noticed that when you use an alert view, the active view grays out a bit. I don't know for sure how Apple has accomplished this, but we can simulate the behavior using a PNG image with a circular gradient that goes from 60% opaque black to 40% opaque black:
We also need a background image for the alert view. Here's one I hacked out in Pixelmator

For your own alerts, you might need to resize or turn this into a stretchable image. For simplicity's sake, I just made it the size I want it. We also need buttons. Again, in a real example, you might want to turn these into stretchable images, but I just kept things simple by making the image the size I wanted it:

The next thing we need is some animation code. We could, of course, create the CAAnimation instances right in our class, but I'm a big fan of both code reuse and Objective-C categories, so instead of doing that, I've created a category on UIView that will handle the two animations we need. One animation "pops in" a view and will be used to show the alert view, the other fades in a view and will be used for the gray background image. The two animations happen at the same time so that when the alert has fully popped into view, the background view is grayed out.
The keyframe timings on the "pop in" animation code are not quite a 100% match for Apple's animation, so if anybody wants to tweak the keyframe values to make a closer match, I'd be happy to update the code with the "correct" values. Here is the category I created to hold the animations:
UIView-AlertAnimations.h
UIView-AlertAnimations.m
As you can see, I've provided two versions of each animation, one that accepts an animation delegate and one that doesn't. This allows the calling code to set an animation delegate so it can be notified of things like when the animation finishes. We'll use a delegate for one of our animations, but we might as well have the option with both.
The next thing we need to do is create the view controller header, implementation, and nib files. In my sample code, I've named the class CustomAlertView. It may seem odd that I giving a view controller class a name that makes it sound like a view instead of something like CustomAlertViewController. You can feel free to name yours however you wish, but this controller class will actually mimic the behavior of UIAlertView and I wanted the name to reflect that. I debated with myself over the name for a bit, but ultimately decided that CustomAlertView felt better since the name would provide a clue as to how to use it. If it feels dirty to you to "lie" in the class name, then by all means, name yours differently.
We're going to need some action methods and some outlets so that our controller and nib file can interact. One outlet will be for the background image, another for the alert view itself, and one for the text field. The latter is needed so we can tell the text field to accept and resign first responder status. We'll use a single action method for both of the buttons on the alert, and we'll use the button's tag value to differentiate between the two buttons.
Because we're implementing fire-and-forget, we also need to define a protocol containing the methods the delegate can implement. Since the alert is designed to accept input, I've made the delegate method used to receive the input @required, but the other method (called only when cancelled) @optional. The enum here is just to make code more readable when it comes to dealing with the button tag values.
CustomAlertView.h
enum
;
@class CustomAlertView;
Once the header file is completed and saved, we can skip over to Interface Builder and create our interface. I won't walk you through the process of building the interface, but I'll point out the important things. Here's what the view will looks like in Interface Builder:

Some important things:
- The content view needs to be NOT opaque and its background color should be set to a white with 0% opacity. The view's alpha should be 1.0. Alpha is inherited by subviews, background color is not, so by making it transparent using background color, we'll be able to see all of the subviews. If we had set alpha to 0.0 instead, we wouldn't be able see the alert view;
- The background view is a UIImageView that is the same size as the content view. Its autosize attributes are set so that it resizes with the content view and it is connected to the backgroundView outlet. It needs to not be opaque and its alpha needs to be set to 1.0. Even though we will be animating the alpha, we want the nib to reflect the final value;
- All of the UI elements that make up the actual alert are all subviews of a single instance of UIView whose background color is also set to white with 0% opacity and is NOT opaque so that it is invisible. This view is used just to group the elements so they can be animated together and is what the alertView outlet will point to;
- The alert view is not centered. In this case, we want it centered in the space remaining above the keyboard;
- The OK button has its tag set to 1,000 in the attribute inspector. The Cancel button has its tag set to 1,001. These numbers match the values in the enum we created in the header file
- File's Owner is the delegate of the text field. This allows the controller to be notified when the user hits the return key on the keyboard
Once the interface is created, all that's left to do is implement the controller class. Here is the implementation; I'll explain what's going on in a moment:
CustomAlertView.m
So, what're we doing here? First, we start by importing the category with our alert view animations and also QuartzCore.h which gives us access to all the datatypes used in Core Animation.
Next, we declare a class extension with a single method. By putting this method here, we can use it anywhere in our class without getting warnings from the compiler yet we do not advertise the existence of this method to the world. This is, essentially, a private method. In a dynamic language like Objective-C, there are no truly private methods, but since the method is not declared in the header file, that's our way of saying "this is ours, don't touch". This method, which you'll see in a moment, will be called after the alert has been dismissed to remove it from its superview. We don't want to remove it until after the fade-out animation has finished, which is why we've declared a separate method.
After we synthesize our properties, the first method we write is show. This is the method that gets called to, well… show the alert. I matched the method name used in UIAlertView and also made it an IBAction so that it can be triggered directly inside a nib file.
The weirdest part of this method is that it actually retains self. This is something you're generally not going to want to do. Since we've implemented our alert view as a view controller instead of a UIView subclass like UIAlertView, we need to cheat a little because a view controller is not retained by anything by virtue of its view being in the view hierarchy. This isn't wrong - we're going to bookend our retain with a release (well, actually, an autorelease) so no memory will leak, but it is unusual and not something you're going to want to use in very many places. When you retain self, you need to take a long hard look at your code and make sure you have a darn good reason for doing it. In this instance, we do.
After retaining, we grab a reference to the window by way of the application delegate and add our view to the window, matching its frame. Then we call the two animation methods we created earlier to fade in the image with the circular gradient and "pop" in the alert view:
- (IBAction)show
The next action method we write is the one that gets called by the two buttons on the alert. Regardless of which button was pushed, we want the text field to resign first responder status so that the keyboard disappears, and we want the alert to fade away. We're going to use implicit animations this time and then use performSelector:withObject:afterDelay: to trigger our private method that will remove the view from its superview. After that, we check sender's tag value to see which delegate method to notify.
- (IBAction)dismiss:(id)sender
The viewDidUnload and dealloc are bog standard, so there's no point in discussing them. The next method after those is our "private" method. It does nothing more than remove the now invisible alert view from the view hierarchy and autoreleases self so that the view controller will be released at the end of the current run loop iteration. We don't want to use release because we really don't want the object disappearing while one of its method is executing:
- (void)alertDidFadeOut
Earlier, when we created the "pop in" animation, we specified self as the delegate. The next method we implement is called when the "pop in" animation completes by virtue of that fact. All we do here is make sure the keyboard is shown to the user and associated with our text field. We do all that simply by making the text field the first responder:
- (void)animationDidStop:(CAAnimation *)theAnimation finished:(BOOL)flag
Finally, we implement one of the text field delegate methods so that when the user presses the return key on the keyboard, it dismisses the dialog.
- (BOOL)textFieldShouldReturn:(UITextField *)textField
At this point, we're done. We can now use this custom alert view exactly the same way we use UIAlertView:
CustomAlertView *alert = ;
alert.delegate = self;
;
;As I stated earlier, you can use this same technique to present anything you can build in Interface Builder, and the result will be a highly-reusable alert object.
Subscribe to:
Posts (Atom)